
Written by Richard Rossmassler - tweaked by Chris Roth.
Part I - Prep the computer
1) Download and install the CDM_Setup.exe
file from here:
http://www.moates.net/zips/CDM_Setup.exe
2) Download and install the latest version of
Flash-n-Burn from here:
http://tunerpro.net/download/SetupFlashBurn.exe
3) Download Chris Roth’s bin from his email or website and save to computer desktop.
Part II - Load the bin
1) Plug F3 adapter into Jaybird
1) Plug USB cable into Jaybird
2) Plug F3/Jaybird into computer USB, wait about 30 seconds for Windows to find the Jaybird.
3) Go into the Windows Device Manager (Control Panel, System, Hardware tab), and look under 'Ports(COM/LPT)'. If there is a 'USB Serial Port' listed, then you are ready to open Flash and Burn, continue to Step 4.
3a)If you have problems finding the USB Serial Port or getting the Jaybird to communicate with Flash and Burn then you will need to troubleshoot.
3b) In Device Manager, expand the 'Universal Serial Bus controllers' section, and right-click on the 'USB Serial Converter'. Go to the 'Advanced' tab, and check the box indicated as 'Load VCP'. Then hit 'OK', unplug the device, and plug it back in. Then return to 3).
3c) Go to the 'Port Settings' tab and then click the 'Advanced' button. Change the COM port setting on the pull-down to COM5, regardless of 'in use' warnings. Accept any warnings.(I typically connect to the Innovate log-chain thru COM4.) While on this page, change the 'Latency timer' to 1mS via pulldown. Click OK to apply all settings and close all Windows Control Panel sub-windows.
4) Unplug and replug the USB cable to the device to verify that it appears in the list with the new settings.
Note: Steps 3 and 4 are only needed the first time you setup the Jaybird on a computer.
5) Open the Flash and Burn software.
| 6) Within the Flash and Burn software, make sure Jaybird is recognized in the white dialog window. |
| Jaybird not
plugged in or something else is wrong. |
| Jaybird
hardware found! (Prom and HW version may vary) |
| 8) Change the Supported Chips to J3 Ford Adapter |
 |
| 9) Click the Load File to Buffer button and brose to the bin to program and open it. |
 |
| Notice the
Chip Addressing Start and End Addresses, these need to be changed. Start is: 032000 End is: 039FFF |
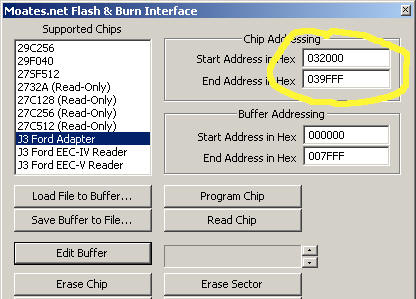 |
Note: Buffer addressing does not need to be changed.
| 10) Click the Erase Chip button. |
 |
| Verify the Erase Succeeded in the dialog window. |
| 11) Click the Program Chip button. |
 |
| Verify the PROM I/O succeeded in the dialog window. |
12) Close Flash and Burn software and unplug the USB cable from the computer.
13) Remove F3 adapter from Jaybird.
14) With ignition off (remove key from ignition) install F3 adapter in EEC.